Mobile Device Photos - MS One Drive Guide
Page updated: 01/07/2026
This guide is for users who are required to take work related photos for their role, using a mobile device, such as a mobile phone or tablet. Please click here to ensure you are familiar with the ‘Handling Personal Data Policy’ and further information regarding ‘Data Protection’ and can be found here.
Whenever possible, MS OneDrive should always be used to take photos when using your mobile device. These will be automatically saved and are accessible on your laptop when you access your OneDrive.
This keeps the photos more secure and within your Microsoft 365 Account.
This also creates a backup, should the handset become lost/damaged.
4G Data or Wi-Fi signal is required for this to work.

Apple Device
- Open ‘One Drive’ on your iPad or iPhone.
- You can create a specific folder within your OneDrive for these photos to be saved to.
- Click on the Camera icon on the bottom middle of the screen.
- For the first time a pop screen will appear stating “OneDrive would like to access your camera”, please click on OK.
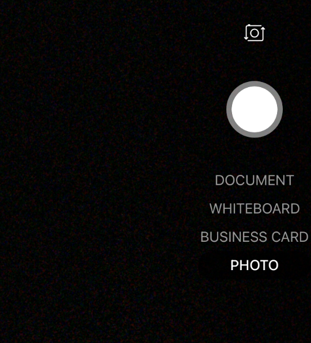
- There will be 4 options available: Document, Whiteboard, Business Card and Photo. Choose the option you require. Then click on the shutter button when you are ready to take the photo.
- Once you have taken the photo, there will be editing options at the bottom of the image
![]()
- Once you have edited the image, if required, click the Done > button.
- If you wish to discard the image, please click on the < arrow at the top left of the page and choose Discard image.
- The Save As page will give you the options to change the title of the image, choose the file to save to or edit again.
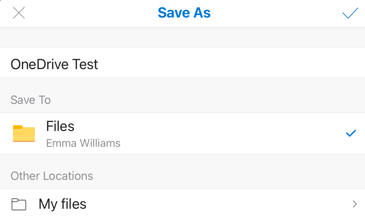
- Click on the Blue tick at the top right of the screen, to save the image to OneDrive.
- A pop-up message at the bottom of the screen will state if the file upload was successful.
- You can now access the image from your OneDrive on your laptop.
Samsung Device
- Open ‘One Drive’ on your tablet or mobile device.
- You can create a specific folder within your OneDrive for these photos to be saved to.
- Click on the blue Camera icon towards the bottom right of the screen.
- For the first time a pop screen will appear stating “OneDrive would like to access your camera”, please click on OK.
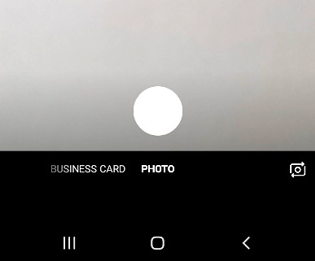
- There will be 4 options at the bottom of the screen underneath the shutter button: Whiteboard, Document, Business Card and Photo. Choose the option you require. Then click on the shutter button when you are ready to take the photo.
- Once you have taken the photo, there will be editing options at the bottom of the image.
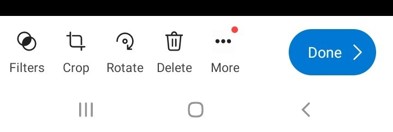
- Once you have edited the image, if required, click the Done > button.
- If you wish to discard the image, please click on the Delete button and then choose Delete.
- The Save As page will give you the options to change the title of the image, choose the file to save to or edit again.

No Data or Wi-Fi Signal Guide
We are aware that many of you carry out site visits throughout the County and therefore mobile signal can be very intermittent.
In these instances, you can take photos using the phone camera, which can then be uploaded to OneDrive once you are at a location where there is Wi-Fi or a data signal available.
It is advisable to upload the photos daily or more regularly, as large amounts can be very time consuming and data draining, and we ae unable to retrieve photos from devices.
Photos taken using the phone camera will need to be deleted manually from within the photos app as soon as they are transferred to OneDrive.
Transferring photos taken with the mobile device camera:
- Open ‘One Drive’ on your mobile device
- Click on the plus sign (+) at the top right of the screen (next to the magnifying glass)
- Select ‘Upload’
- Select photo/’s to be transferred by clicking on the image. A blue tick will appear on all selected images
- Click on the Blue OneDrive Icon at the top of the screen
- Choose the file you wish to save to
- The images will automatically upload to the chosen folder and will be accessible in OneDrive.
- Delete the images immediately from the Gallery app once you can see them in your OneDrive folder.
Alternatively, you can transfer directly from the Gallery app:
- Open Gallery App
- Select photos to upload
- Click on photo
- Click on share
 icon
icon
- Choose the OneDrive icon from the available options
- Select OneDrive from the options
- Choose the file you wish to save to
- Tap on the tick located at the top right corner to upload to OneDrive
- The images will automatically upload to the chosen folder and will be accessible in OneDrive
- Delete the images immediately from the Gallery app once you can see them in your OneDrive folder
- PLEASE NOTE: that All Personal data as defined in the below policy, must be deleted from your OneDrive account and mobile device, once it has been transferred/stored on the CFP, SharePoint, Info@Work, APP, CIVICA, CareFirst, Eclipse, etc. As per the ‘Handling Personal Data Policy’:
- Handling personal data
You only need to delete from OneDrive on one device, this will replicate to all devices with your One Drive account.
Photos taken using the phone camera will need to be deleted manually from within the photos app as soon as they are transferred to OneDrive.
IT Support
IT Expression of Interest Request
Working Remotely
IT Policies
IT Strategies
IT Security
- Exchange Online Protection
- Windows Security Updates
- Encrypted Emails
- Self Service Password Reset
- Multi Factor Authentication
Print and Scan
Mitel IP Phone Settings and Features
Optimising Home Broadband
Portable Devices
- Mobile Phones
- Bring Your Own Device (BYOD)
- WhatsApp Guidance
- Tethering/Mobile Hot Spot
- Mobile Device Photos - MS One Drive Guide
Install your own software
Web Browsers
More from IT Support