Private Teams Meetings
Page updated: 01/07/2026
When creating a Teams meeting, you may want to make the meeting private. This ensures that users that have not been invited to the meeting, are unable to read the meeting subject in your calendar, and the calendars of all the invited users. It also ensures that uninvited users cannot see the meeting description and are unable to join the meeting via the Teams link.
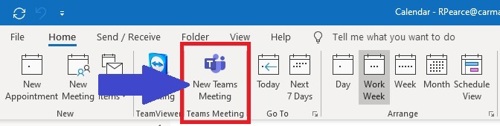
To make a Teams meeting private, always set the meeting up using your Outlook calendar. Once in your calendar, click on ‘New Teams Meeting’ on the top banner.
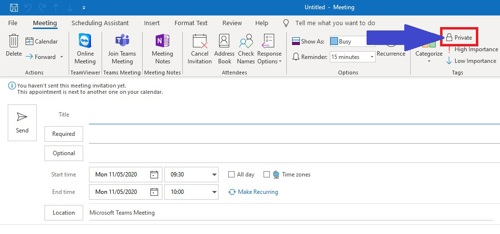
In the Meeting Request window that appears, fill out all the relevant details, remembering to click on the ‘Private’ icon (this will have a padlock icon next to it) in the top right corner, before sending your meeting request.
For more information on setting up Teams’ meetings, as well as setting up meetings with external contacts, please download the ‘Setting Up Teams Meetings’ PowerPoint.
Leave or remove someone from a group/meeting chat
There may be situations when you will need to remove someone from a group chat within Microsoft Teams.
For example:
During a scheduled meeting someone (who was not on the initial invite list) is asked to join the meeting. This action automatically adds that person to the meeting group chat and even after they leave the meeting, they will receive all subsequent chat messages posted within the group. If the meeting is a monthly reoccurring meeting, they will also continue to receive any future group chat messages.
In this circumstance, to avoid potentially and inadvertently sharing information, you can remove that someone from a group chat by following the below steps:
1. Select ‘Chat’ from the left-hand rail within Teams to open the chat list.
2. Navigate to the group chat from where you want to remove someone.
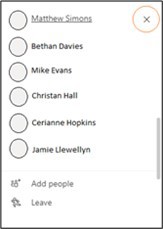
3. Click on the number of participants in the upper right of the screen (‘View and Add Participants’).

4. Hover on the person's name that you want to remove and select the ‘X’ beside their name, then confirm you want to remove the participant from the group chat.
An update in the chat will inform others that you have removed the person.
People removed from a group chat will be able to view previous chat history, but will not be able to send new messages, react to messages, and will not be able to view new conversations or files shared by the group.
After you join a group chat, you can decide whether you want to remain a member and continue to receive chat messages or leave the group.
If you are considering leaving a group because you are being inundated by notifications about new messages, you can instead just turn off notifications or mute the chat from that group/meeting.
If you decide to leave a group chat in Teams, follow the below steps:
1. Select ‘Chat’ from the left-hand rail within Teams to open the chat list.
2. Navigate to the name of the group you want to leave.
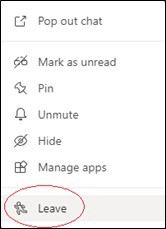
3. Click on the 3dots (more options) beside the chat and then select Leave.
An update in the chat will inform others that you left the group. If you change your mind, just ask someone to re-invite you to the group.
Note: If someone has been removed or decides to leave a group chat, their chat messages remain in the chat history. Any changes to the chat history can be seen by them, so try to avoid editing these messages.
To secure group chat messages associated with a meeting, the organiser could make it a channel meeting so only members of that channel/team can access the chat (before, during and after the meeting). If you choose to use this method you will then need to mark the meeting as ‘private’ within your Outlook calendar.
IT Support
IT Expression of Interest Request
Working Remotely
IT Policies
IT Strategies
IT Security
- Exchange Online Protection
- Windows Security Updates
- Encrypted Emails
- Self Service Password Reset
- Multi Factor Authentication
Print and Scan
Mitel IP Phone Settings and Features
Optimising Home Broadband
Portable Devices
- Mobile Phones
- Bring Your Own Device (BYOD)
- WhatsApp Guidance
- Tethering/Mobile Hot Spot
- Mobile Device Photos - MS One Drive Guide
Install your own software
Web Browsers
More from IT Support